WebGL CNN Followup
The previous post on this topic was about how it works and how I implemented it in GLSL. I should probably talk a bit more about why I did it and why it might be useful in the future. But first, a little more how…
TL;DR: It turns out not to be as ground-breakingly fast as I hoped it would be, but I think there is a future for all this work.
Overview
The WebGL CNN is essentially an all convolutional net which is a CNN which omits the use of max-/avg-pooling by taking advantage of the fact that you can deliberately scale an input tensor (read: image) with careful selection of kernel size and stride. A simple case being a kernel size of 4x4 and a stride of 2 will halve the image in x and y.
Pooling layers are a lossy compression; a 2x2 max-pool just throws away 75% of the data. A strided convolution at least “sees” all the data and it is included in the downsampling. I haven’t read up enough to know for sure if this is good or not, but intuitively it seems better than just chucking data away.
The image below shows a simple example, all filters are 4x4 with a stride of 2.
- Input: 32x32x3 image (webcam)
- Conv2D Downsample: 64 filters
- Conv2D Downsample: 256 filters
- Conv2D Upsample: 64 filters
- Conv2D Upsample: 3 filters
- Output: 32x32x3 image
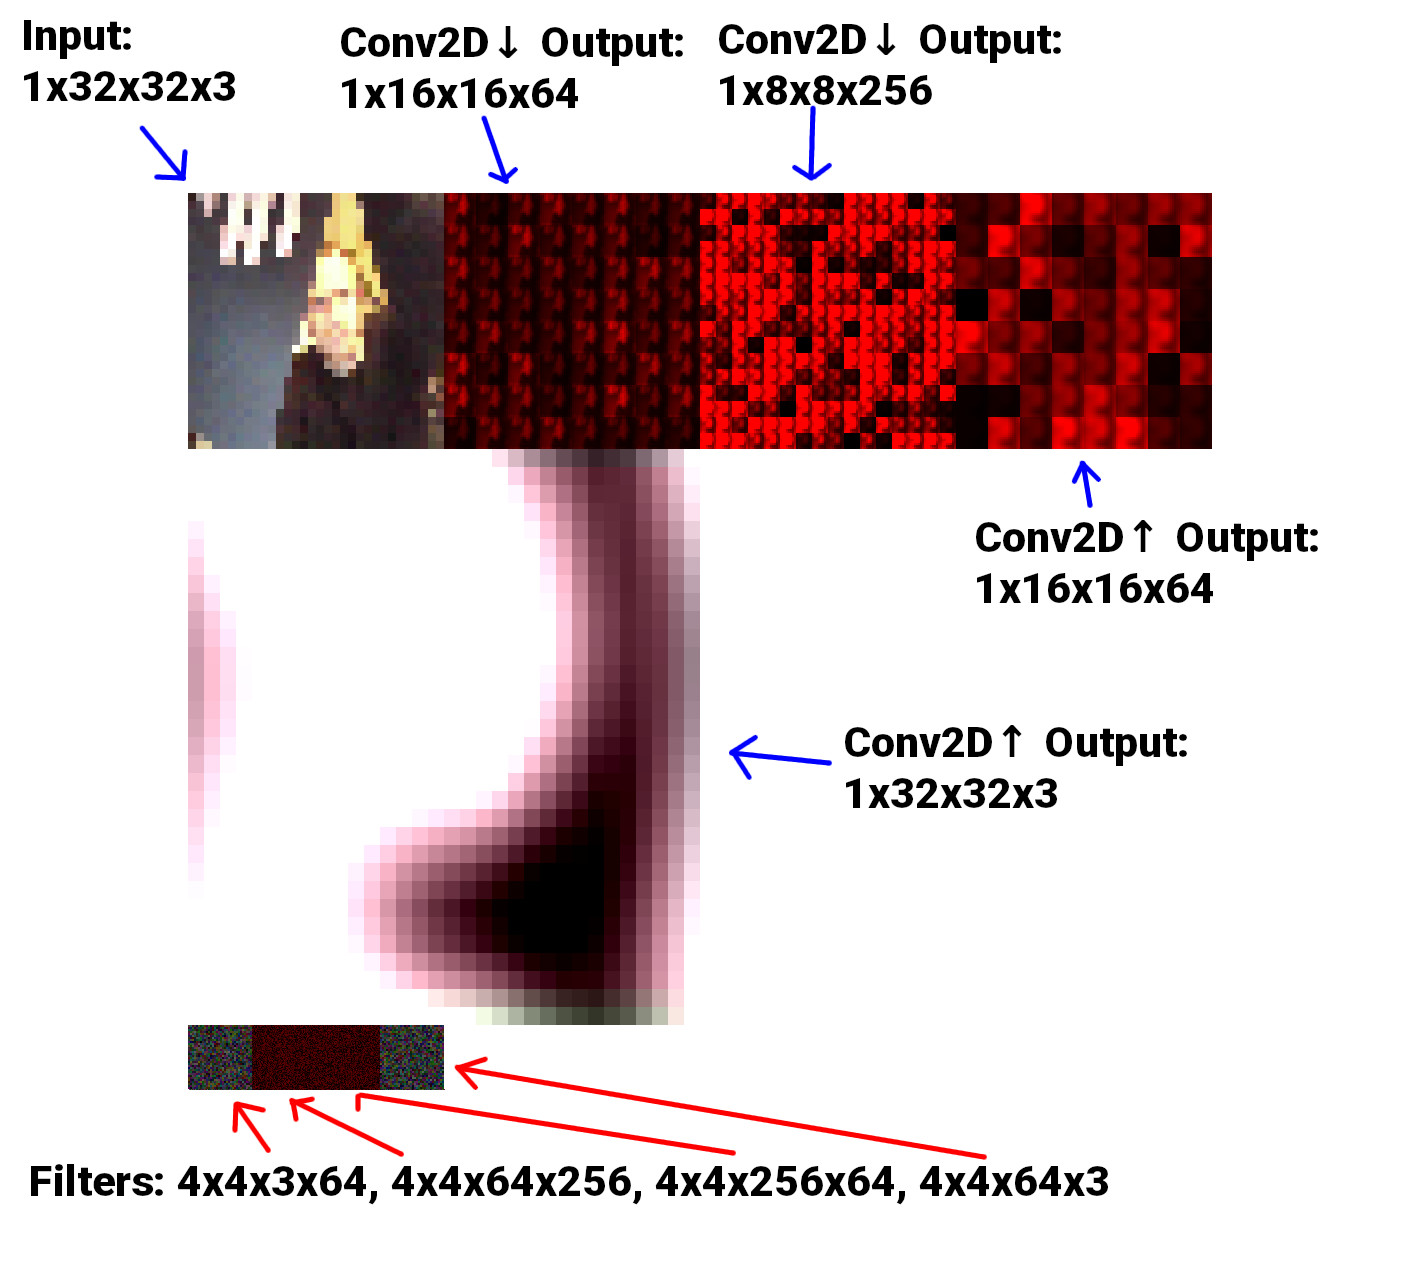
I have used “standard” notation (as used in Tensorflow and PyTorch) for the tensors by including the batch-size as the first unit: [bs]xWxHxD where D is in fact the number of filters from the previous layer. I guess I was inconsistent when labelling the filters, but they’re: WxHxNcxNf where Nc is the number of channels of the previous layer (or num filters), and Nf is the number of filters for that particular layer.
All the filters are just randomly initialised and nothing about the model is trained to do anything, hence the blurry mess of an output. But at least data is evidently travelling through the model and the input correlates to the output.
The model above is equivalent to the diagram below, when visualised as 3D volumes:
32x32x3
16x16x8
8x8x16
16x16x8
32x32x3
API
To make it felixible enough to test at different sizes a simple library had to be made. There is a single Conv2D class which is basically boilerplate code to set up a simple shader program with the relevant downscale or upscale shader; a texture for input, the filters and the output; a framebuffer to render into and then some getters to get the data out.
Here is an example of the middle 2 layers of the model above:
const DOWNSCALE = new Conv2D(gl, {...});

const DOWNSCALE_2 = new Conv2D(
  gl,
  {
    input: {
      size: DOWNSCALE.opts.output.size,
      num_channels: 1,
      texture: DOWNSCALE.output,
    },
    output: {
      size: 8,
      num_channels: 1,
    },
    filter: {
      num_channels: 1,
      num: 16,
      type: 'down',
    },
    prev: {
      num_filters: DOWNSCALE.opts.filter.num,
    },
  },
  {
    vs: BASIC_VERT,
    fs: require('./glsl/downscale_2_frag.glsl'),
  }
);

const UPSCALE = new Conv2D(
  gl,
  {
    input: {
      size: DOWNSCALE_2.opts.output.size,
      num_channels: 1,
      texture: DOWNSCALE_2.output,
    },
    output: {
      size: 16,
      num_channels: 1,
    },
    filter: {
      num_channels: 1,
      num: 8,
      type: 'up',
    },
    prev: {
      num_filters: DOWNSCALE_2.opts.filter.num,
    },
  },
  {
    vs: BASIC_VERT,
    fs: require('./glsl/upscale_frag.glsl'),
  }
);

const UPSCALE_2 = new Conv2D(gl, {...});
Calling DOWNSCALE.output gets the output texture of that layer. filter.num is actually the square root of how many filters there are. Given the nature of the process, working with square textures with square dimensions is very helpful - so num: 8 actually means 64 filters in an 8x8 grid.
OK, so… Why?!
GOOD QUESTION. This took up a good chunk of time and for most of it I was going on instinct. The idea pretty much came after looking at the stack trace of a TensorflowJS model running in the browser and seeing exactly (ish) what is happening at runtime.
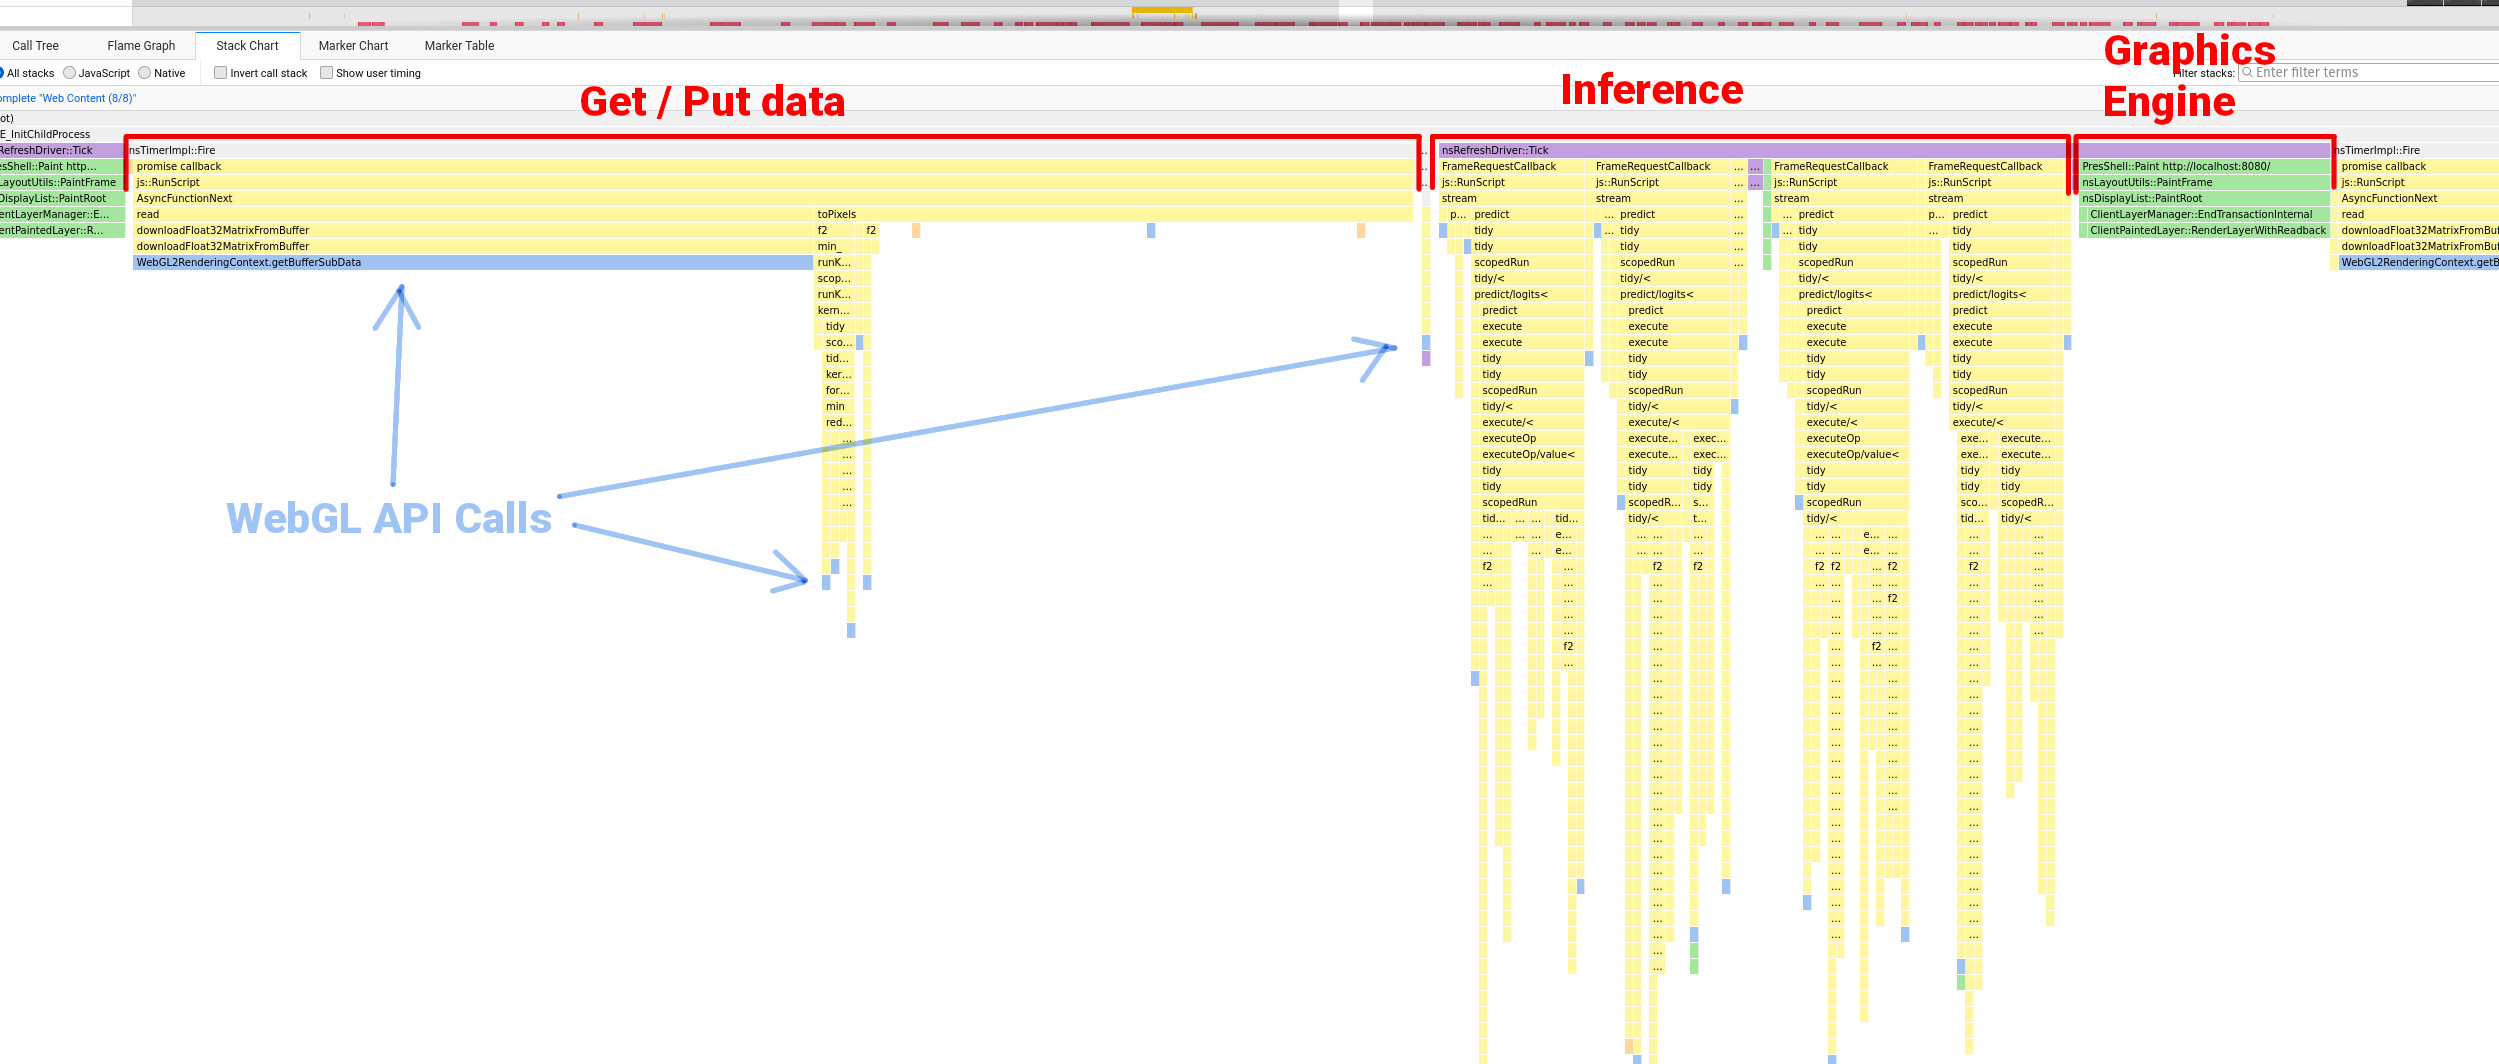
To me this look pretty hectic. I think Javascript stack traces get confusing because there are so many callbacks and asyncronous functions all over the place, so the sequence doesn’t always make sense when compared to the code. But you can make sense of routines which occur in chunks, the spiky stacks with a lot of function calls is the model doing it’s thing.
There are plenty of resources that tell you that good practice when using WebGL is to make WebGL API calls as rarely as possible. In the stack trace above you can see quite a few WebGL API calls (in light blue). It seemed to me that this could be something of a performance bottleneck - something which favors a flexible backend (TensorflowJS).
A WebGL wrapper to handle data IO and rendering made significant improvements so perhaps replacing the whole thing with a more efficient and bespoke WebGL based thing would speed it up even more?
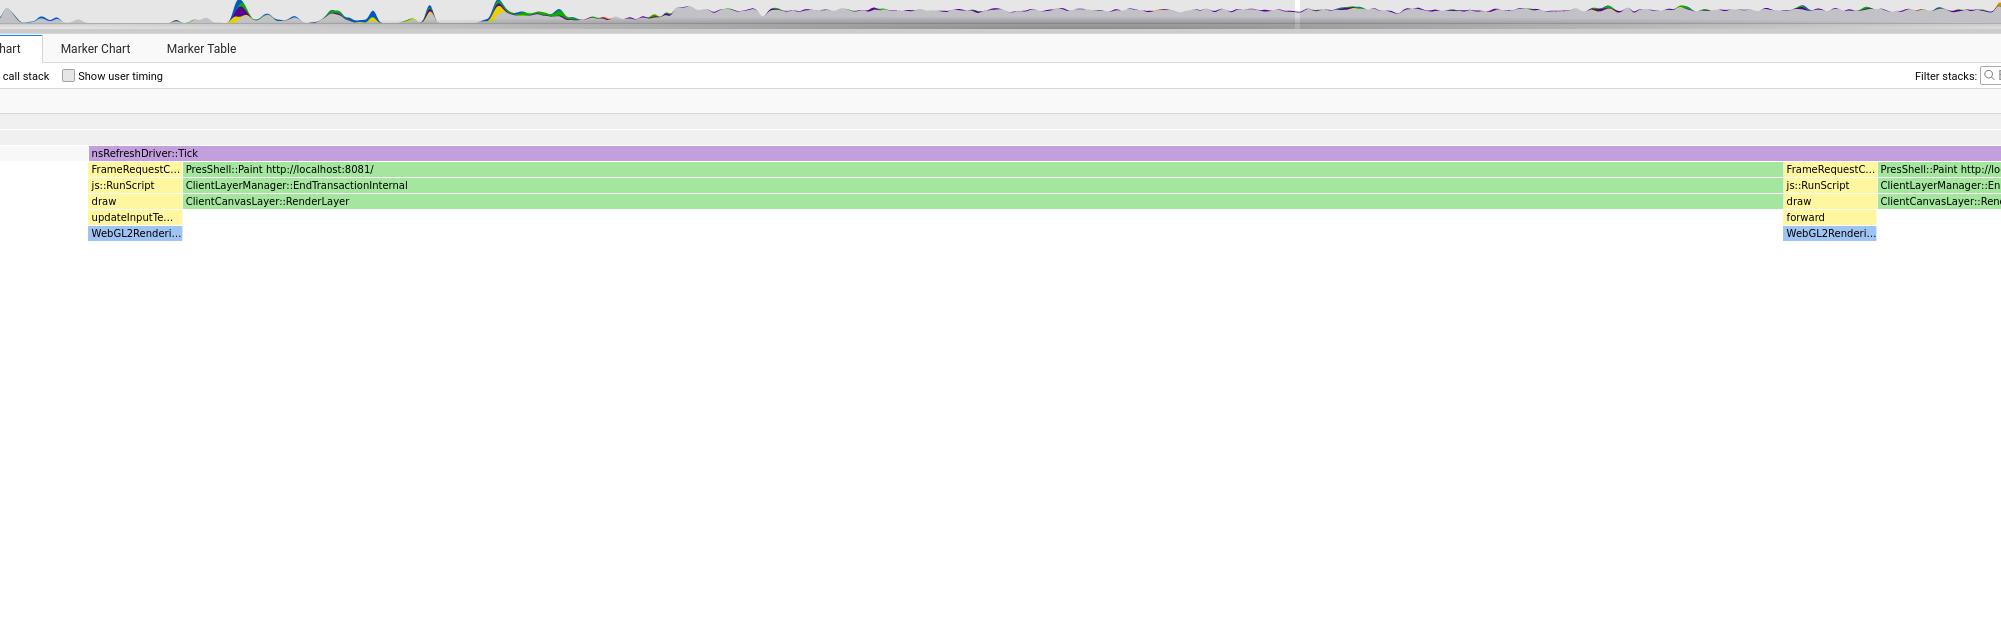
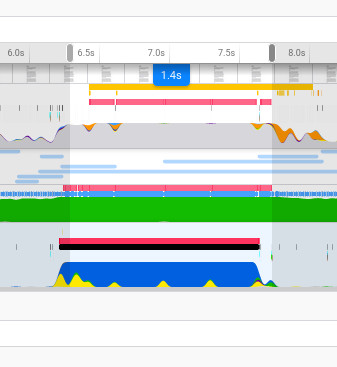
This was my thinking any way. And at first things looked promising. Looking at the stack trace of a simple example you can see that the overall system is much, much simpler. Here is the equivalent to the stack trace above (a single step including model inference and rendering):
And the whole profile recording of the model running for a few seconds or something:
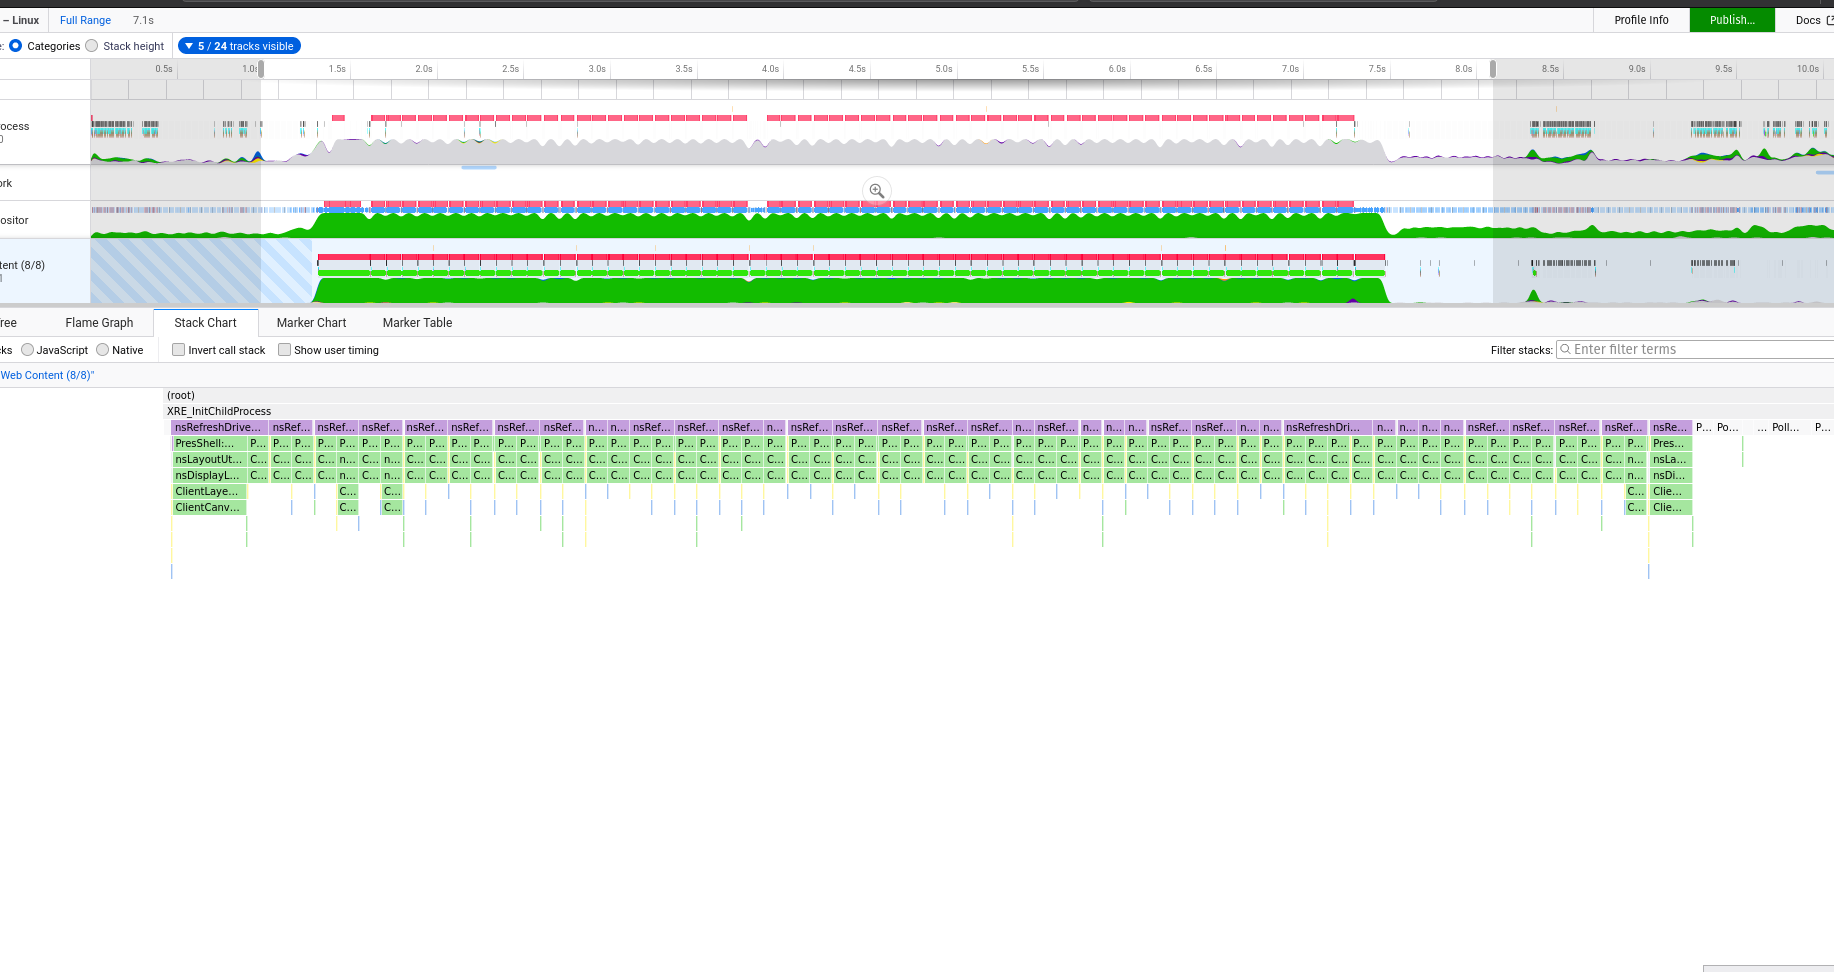
You don’t get to see what the GPU is doing with these browser profiling tools but wherever you see green means the JS engine is handing over to the graphics engine. If data can be handed over and then only requested when it’s needed (to render) then that should be a good thing.
Results
The acid test was to create a model of equivalent architecture to that of the Pix2Pix generator, make sure the WebGL CNN is performing the equivalent number of calculations, and compare the running time differences…
TensorflowJS model inference time (using WebGL wrapper):
WebGL CNN model inference time:

They’re the same! Give or take a few milliseconds I’m sure.. So! I don’t think this is gonna make too many waves in terms of getting big models running in the browser, and clearly the team behind TensorflowJS are pretty good! But I still think there are applications and uses for what I’ve done.
A Proper Test
The model described right at the top is a pretty simple little autoencoder model. Similar models are often used in Autoencoder tutorials. So I implemented the equivalent model in PyTorch and trained it for a few epochs on the Fashion-MNIST dataset.
PyTorch makes the model layer and layer weights quite accessible. The tricky part is reshaping the data in a compatible format with the WebGL CNN (which of course has all data in 2D textures). I wasted a fair amount of time on silly methods, but turns out PyTorch has a very nifty function called make_grid which lays data out exactly as I want it.
The image below shows the helper functions I made to get the filters out the model in the right format:
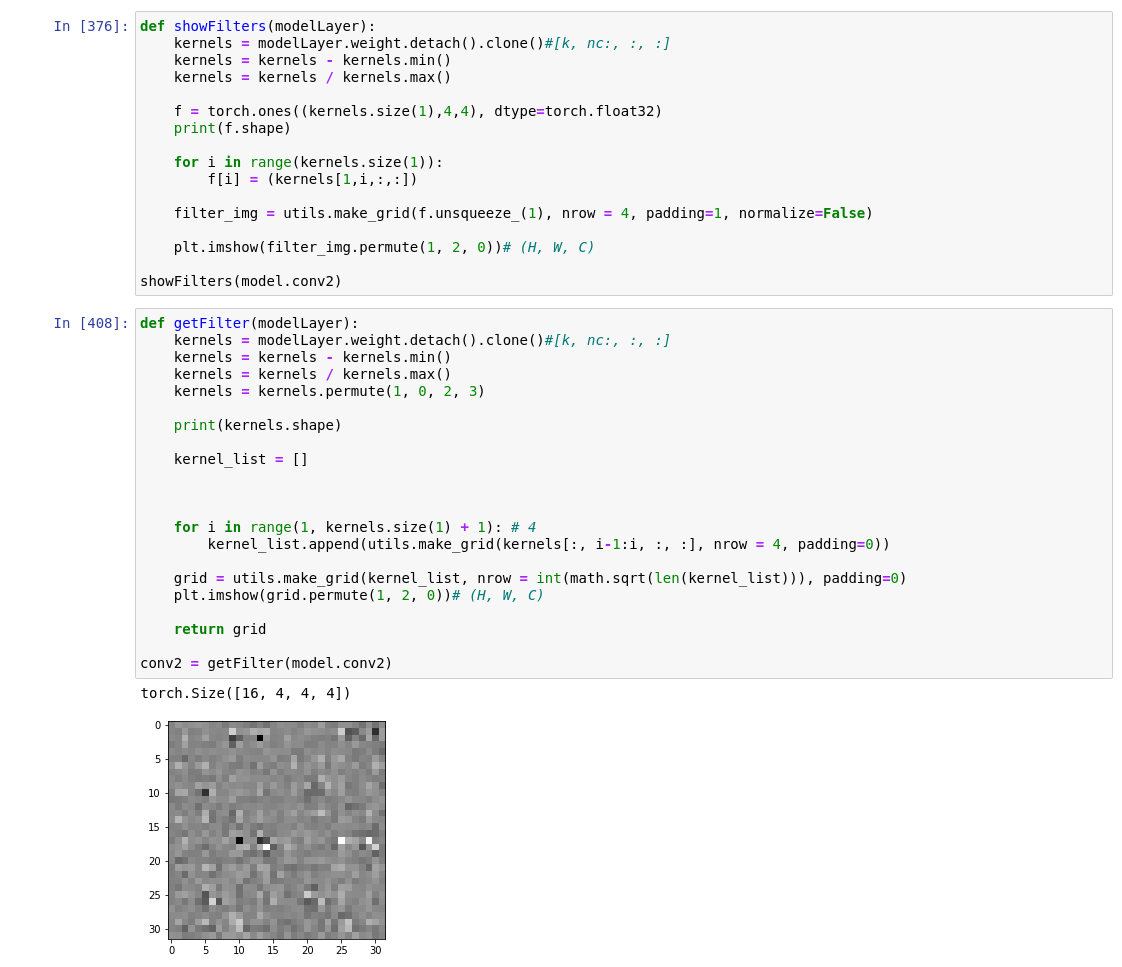
The weights were then saved using Numpy’s .npy format - a super lightweight and simple format which contains information about the array structure in the header and then the data. It’s quite straightforward to unpack this as a binary in Javascript, but I opted for this nice simple loader which offers more of a catch-all solution than doing it myself. (Plus it’s quite small, I hate using big hefty swiss-army-knife kinda things, which is why I often end up doing things myself…)
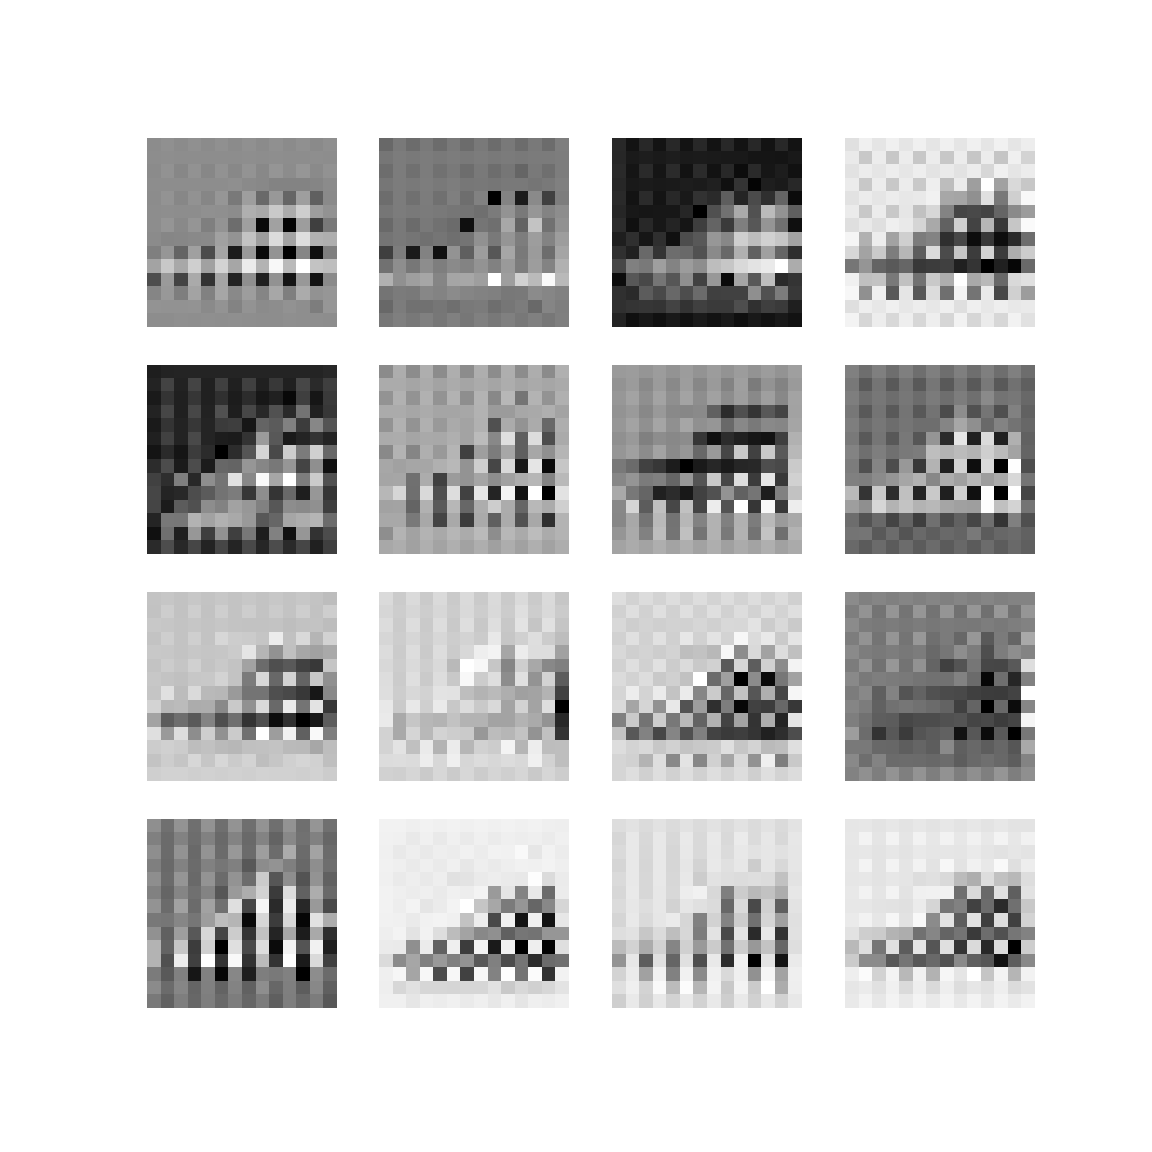
A similar process was done for the biases, then these could be loaded into the model quite simply as textures and passed into the shaders. And lo’, marvel at the unbeliveable results:
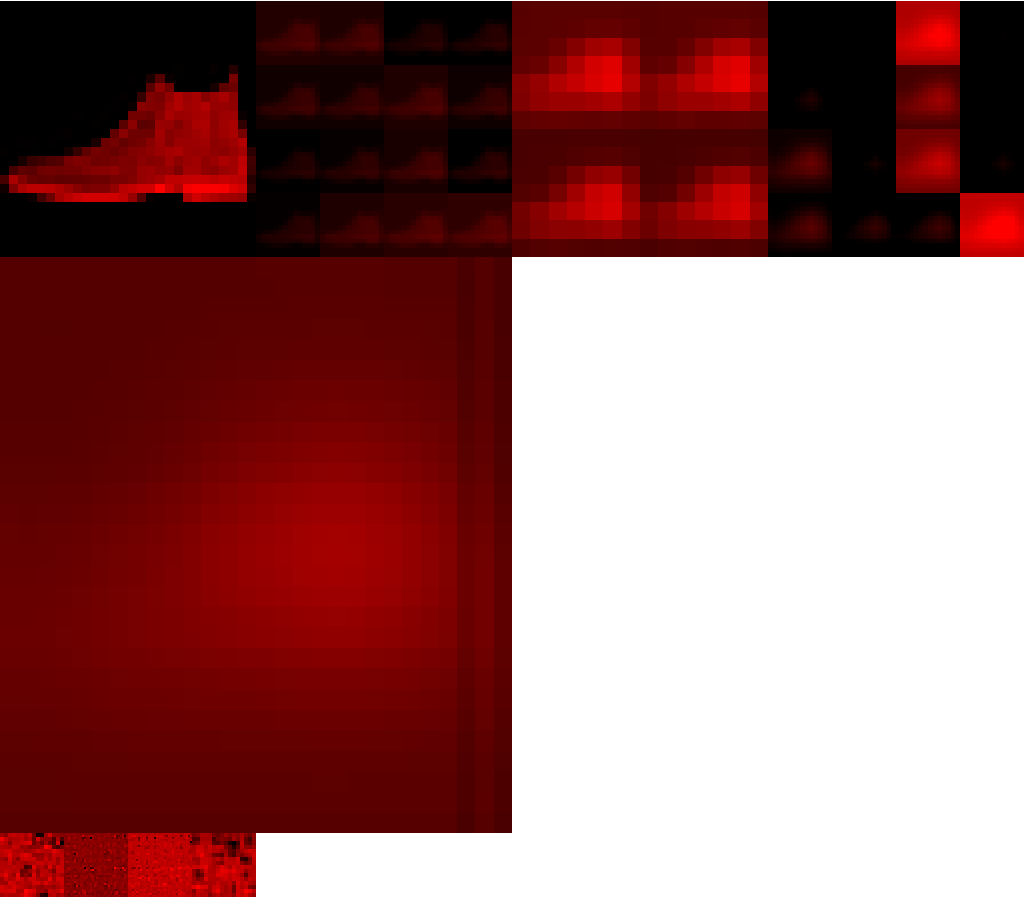
![]()
In all seriousness though, I still don’t think this is a lost cause, there are just endless hurdles to overcome:
Hurdles
WebGL does not deal with negative numbers very well
You can perform calculations with negative numbers in a shader fine, but you cannot render a negative number; they get clipped at 0. So you can’t render negative values into a framebuffer which is at the core of how data moves from one layer to another. Not a show stopper, but it means constantly scaling numbers to fall in the range [0, 1] which is GLSL’s happy place. The scaling can get difficult because that means being able to normalise a across all values of a texture.. which means knowing the min/max values.. which in a fragment shader isn’t particularly easy as you only have access to that particular fragment. Hmm.
The upscaling process is fundamentally different
AFIAK PyTorch and Tensorflow use a dilated convolution when upscaling which looks a bit like this:
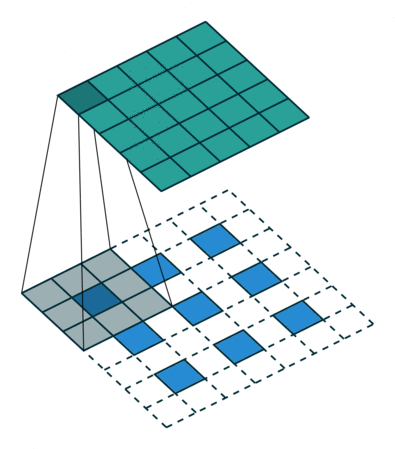
Technically this is called a padded convolution but I find that so misleading.. the padding is on the inside? That’s dilation if you ask me. This can be seen when you look at the output of the upsampling layer in the PyTorch model:
Again not time to abandon this just yet, I just think that if the model was trained on the kinda of upsampling the WebGL CNN uses (fractional striding) then you would see better results.
More info here, here and here to help understand upscaling convolutions.
There are more hurdles I’m sure but I can’t remember them right now.
Good Things
The potential in this system is how readily available the data is and it’s already set up in a visual way. Everything is 2D, so displaying data is as easy as:
gl.bindTexture(gl.TEXTURE_2D, LAYER.output);
gl.viewport(0, 0, 256, 256);
gl.scissor(0, 0, 256, 256);
gl.drawArrays(gl.TRIANGLES, 0, verts.length / 2);
Or LAYER.filter or whatever. The DREAM would be have this system trainable and to be able to witness it training in real time, much like Karpathy’s ConvNetJS, but faster! And interactive?! Perhaps you could influence the filters while it’s training and see how that affects the output. Even to do that once it’s trained at runtime would be interesting. Bringing in some ideas developed in Broad’s Network Bending, but in real time!
I don’t see why this model couldn’t train. It would need to be developed a lot furthur to bring in more features and operations, like ReLU, batchnormalisation, different sized filters/strides perhaps. And then backpropagation and all the gubbins needed to actually train a model of course. But not beyond the realm of possibility.
Summary
I think it’s got legs!